In this article, we explain how to use webhooks to notify you of new account events.
Webhooks can be a very useful tool to inform you of new updates to your account such as new flags or if there has been a new phone number added to your account. All available events are listed below:- Number Added
- This event is triggered when new numbers are added to your account through One by One, Imports, or API.
- Number Unflagged
- This event is triggered once we complete scans and see that a previous flag on your number has been removed. One number can have multiple triggers (for example, you may receive 3 events for 1 number if 3 flags were removed.). Keep this in mind if you have a lot of numbers as this could lead to a lot of messages coming in.
- Number Flagged
- Similar to Unflagged, this will trigger for each new flag we detect on each number. The same rule applies in where you may receive more then 1 event for 1 number.
- Number Deleted
- This event occurs if a number has been deleted either by a user within your account or through the API. This is NOT the same as archiving a number.
- Number Archived
- This event occurs if you store a number in archive either in your account or through the API. This is NOT the same as deleting/removing a number.
- Scan Completed on Service
- This event will occur once we complete a scan on a certain service such as YouMail or Verizon. This does not provide which numbers have been scanned or flagged/unflagged.
- Call Test Completed
- This is used for our STIR/SHAKEN call tester and will fire off once we receive a successful call from one of your numbers. You'll be able to include the response in this message to be passed along to your webhook URL as well if needed.
From here, you can choose which webhook events you wish to use. You do not need to use all or any of the the webhooks if you wish.
Once you know which webhook events you wish to use, you'll want to also consult with documentation on the URL provider you're using. For this first example, we will use Google Chat.
Example A - Google Chat Integration
Using this Webhook integration with Google Chat, we can send messages to a Space to inform our team of account events.
First, head on down and either join or create a new space. If you already have one available, this works too!
Next, at the top of the Space where your title is, you should be able to click on the drop down menu. From here, you'll want to click on "Apps & Integrations".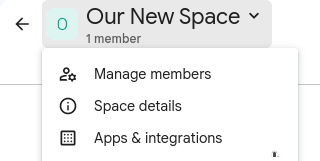
Then, at the bottom of the newly opened window, click "Manage Webhooks"
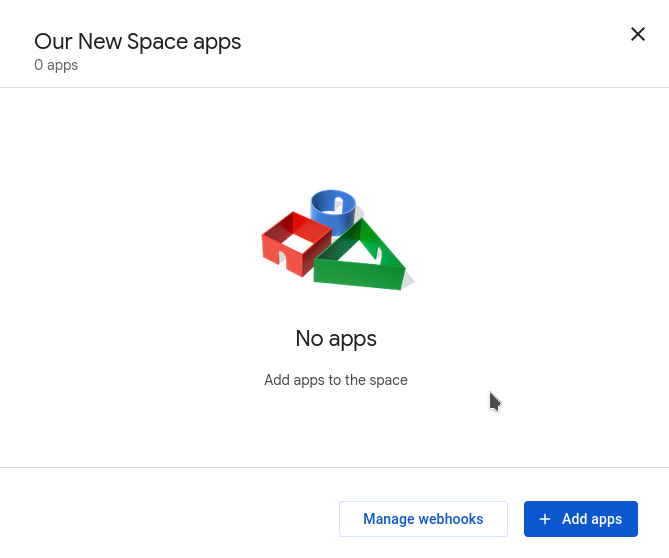
From here, you can give your new integration a name. For this demonstration, we will call it "Caller ID Reputation Notifications". Once you've provided a name, you should now see a triangle-like icon with a URL. This is your Webhook URL that we will need to insert into your Caller ID Reputation account later on. Be sure to hang onto this!
(You can click the Copy icon with the two pages next to the three dots to copy this URL)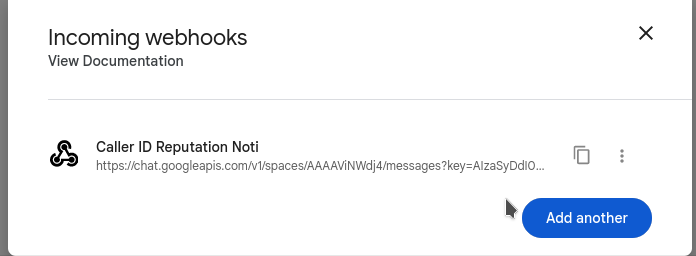
Go ahead and close out of this window once you've copied that URL. Now that our integration has been added to our Google Space, we want to complete this integration in Caller ID Reputation.
Head on down to your Caller ID Reputation account and head into Settings. Further down your Settings page, you should see a "Webhook Notifications" section that includes all the Webhook events we talked about earlier (this should be between the Danger Zone section and the Notification Settings section).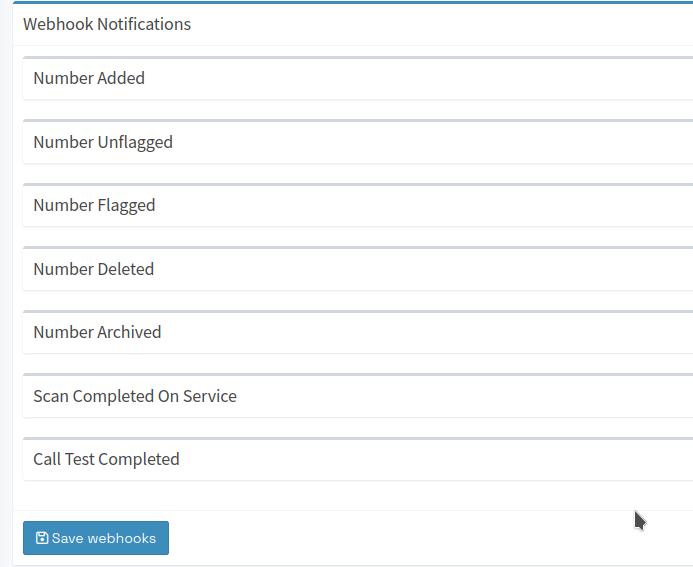
Using the Number Added event
To send any new events about numbers being added to your account, you'll want to open the Number Added section. This can be done by clicking the + icon to the right.
From here, you should see a section to add your URL and a dropdown that says "GET" or "POST".
Go ahead and add the URL we copied earlier to this section. Once you've pasted this URL, ensure that the dropdown says "POST", not "GET". After changing this, you should see more sections including Headers and Form Data.
Under Form Data, there should be an additional drop down. Ensure this drop down says "JSON". Finally, under the section that says "Key" and "Value", insert "text" under Key and a message you wish to add in Value. You can add 3 available variables that will show number information on the event. For this example, we will use "A new number at {PHONENUMBER} has beed added to your account with the description {DESCRIPTION} assigned to the call group {CALLGROUP}".
Once you're finished, your configuration should look similar (not exact!) to this photo:
Make sure to save this configuration using the blue button at the bottom of the Webhooks section named "Save webhooks" and you're set! Now any new numbers that are added to your Caller ID Reputation account should show a message like this: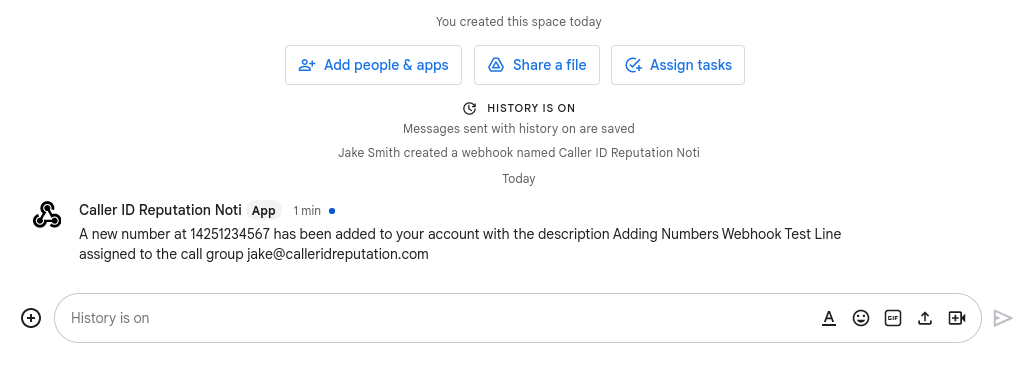
Using the Number Deleted event
To send any new events about numbers being removed from your account, you'll want to open the Number Deleted section. This can be done by clicking the + icon to the right.
From here, you should see a section to add your URL and a dropdown that says "GET" or "POST".
Go ahead and add the URL we copied earlier to this section. Once you've pasted this URL, ensure that the dropdown says "POST", not "GET". After changing this, you should see more sections including Headers and Form Data.
Under Form Data, there should be an additional drop down. Ensure this drop down says "JSON". Finally, under the section that says "Key" and "Value", insert "text" under Key and a message you wish to add in Value. You can add 3 available variables that will show number information on the event. For this example, we will use "A number at {PHONENUMBER} has been deleted from your account with the description {DESCRIPTION} assigned to the call group {CALLGROUP}".
Once you're finished, your configuration should look similar to this photo:
And finally, to verify, you should also receive a message in your Space similar to this:
Using the Number Flagged event
To send any new events about numbers that have received new flags, you'll want to open the Number Flagged section. This can be done by clicking the + icon to the right.
From here, you should see a section to add your URL and a dropdown that says "GET" or "POST".
Go ahead and add the URL we copied earlier to this section. Once you've pasted this URL, ensure that the dropdown says "POST", not "GET". After changing this, you should see more sections including Headers and Form Data.
Under Form Data, there should be an additional drop down. Ensure this drop down says "JSON". Finally, under the section that says "Key" and "Value", insert "text" under Key and a message you wish to add in Value. You can add 4 available variables that will show number information on the event. For this example, we will use "A number at {PHONENUMBER} has been flagged by {FLAGGED_SERVICE} with the number description {DESCRIPTION} and the callgroup assignment {CALLGROUP}".
Once you're finished, your configuration should look similar to this photo:
And to verify our configuration, we should receive a message like so:
Using the Number Unflagged event
To send any new events about numbers that have received new unflag events/dropped flags, you'll want to open the Number Unflagged section. This can be done by clicking the + icon to the right.
From here, you should see a section to add your URL and a dropdown that says "GET" or "POST".
Go ahead and add the URL we copied earlier to this section. Once you've pasted this URL, ensure that the dropdown says "POST", not "GET". After changing this, you should see more sections including Headers and Form Data.
Under Form Data, there should be an additional drop down. Ensure this drop down says "JSON". Finally, under the section that says "Key" and "Value", insert "text" under Key and a message you wish to add in Value. You can add 4 available variables that will show number information on the event. For this example, we will use "A number at {PHONENUMBER} has been unflagged by {UNFLAGGED_SERVICE} with the number description {DESCRIPTION} and the callgroup assignment {CALLGROUP}".
Once you're finished, your configuration should look similar to this photo:
Using the Number Archived event
To send any new events about numbers being archived in your account, you'll want to open the Number Archived section. This can be done by clicking the + icon to the right.
From here, you should see a section to add your URL and a dropdown that says "GET" or "POST".
Go ahead and add the URL we copied earlier to this section. Once you've pasted this URL, ensure that the dropdown says "POST", not "GET". After changing this, you should see more sections including Headers and Form Data.
Under Form Data, there should be an additional drop down. Ensure this drop down says "JSON". Finally, under the section that says "Key" and "Value", insert "text" under Key and a message you wish to add in Value. You can add 3 available variables that will show number information on the event. For this example, we will use "A number at {PHONENUMBER} has been archived in your account with the description {DESCRIPTION} assigned to the call group {CALLGROUP}".
Once you're finished, your configuration should look similar to this photo:
And finally, to verify, you should also receive a message in your Space similar to this:
Using the Scan Completed On Service event
To send any new events about completed scans, you'll want to open the Scan Completed On Service section. This can be done by clicking the + icon to the right.
From here, you should see a section to add your URL and a dropdown that says "GET" or "POST".
Go ahead and add the URL we copied earlier to this section. Once you've pasted this URL, ensure that the dropdown says "POST", not "GET". After changing this, you should see more sections including Headers and Form Data.
Under Form Data, there should be an additional drop down. Ensure this drop down says "JSON". Finally, under the section that says "Key" and "Value", insert "text" under Key and a message you wish to add in Value. You can add 1 available variable that will show which service has completed scans. For this example, we will use "The service, {SERVICE} , has completed scans and is ready to view new results.".
Once you're finished, your configuration should look similar to this photo:

Using the Call Test Completed event
To send any new events about completed STIR/SHAKEN call tests, you'll want to open theCall Test Completed section. This can be done by clicking the + icon to the right.
From here, you should see a section to add your URL and a dropdown that says "GET" or "POST".
Go ahead and add the URL we coped earlier to this section. Once you've pasted this URL, ensure that the dropdown says "POST", not "GET". After changing this, you should see more sections including Headers and Form Data.
Under Form Data, there should be an additional drop down. Ensure this drop down says "JSON". Finally, under the section that says "Key" and "Value", insert "text" under Key and a message you wish to add in Value. You can add 1 available variable that will show test information on the event. For this example, we will use "A call test has completed and has received the response {RESPONSE}".
Once you're finished, your configuration should look similar to this photo:
